Thursday, October 21, 2010
Brand New Nikkor 80-200mm f/2.8 RM3500
Price : RM3500
FOC shipping witin peninsular malaysia
for booking please call
0124436143
0195112662
MZAIDI Technology
http://digitalgadgets2u.com

Wednesday, October 20, 2010
Brand New Canon 1000D RM1580 (FOC 4gb sd card +bag sling)
Price : RM1580
FOC
4gb SD card
bag sling
shipping witin peninsular malaysia
for booking please call
0124436143
0195112662
MZAIDI Technology
http://digitalgadgets2u.com
BRAND NEW YN 460 RM180
Price : RM180
for booking please call
0124436143
0195112662
MZAIDI Technology
http://digitalgadgets2u.com
Brand New Canon 60d
Price : RM3050 (BODY ONLY)
for booking please call
0124436143
0195112662
MZAIDI Technology
http://digitalgadgets2u.com
Saturday, May 23, 2009
The Magazine Shoot
Here's the best part! It measured a massive 11 feet high, 8 feet wide by 6 feet deep! It was like 1/3rd the size of my garage studio! I wouldn't even have room to put a gear bag inside while I shoot! But guess what, for all its negatives, the place had more "Character" than anything I have seen since watching an old Friday the 13th horror flick! Now, firmly intent on photographing the very Soul from this set I set out to plan my lighting scheme(s) to go in and come out happy! Just a little side note. Having a creative visionary to help you spot out things like this and plan this is ultra critical! Kevin was instrumental in the look and style of the shoot he said keywords that I was able to translate into my lighting. Hey New Guys! Serious word of advice, find another photographer and BE friends! Bounce ideas and share! Look at my sharing, 30+ thousand a month! It makes everyone better!





Regard,
Mohd Zaidi Bin Desa
Principal Photographer
Mzaidi.com
+60195112662
edphotographykedah@gmail.com

SHOOT DAY
With rain clearly in threat, I reluctantly call off my assistant for the day. (Sorry again Mrs. Land.) Because of over packing I am embarrassingly the last to arrive. The MUA had already begun the magic of applying a severe coating of "Pancake Makeup" to Kevin's face. Under the clock of 2 hrs to play we were given a heckuva gift to test out… the Paul C. Buff ABR-800. Now, I will make an honest confession Studiolighting.net. Totally honest. This was the absolute very first time I had used a ring light! The closest thing to it was placing an 84inch Photek Sunbuster umbrella directly behind me in a 1200 watt Profoto head (studio rental) to simulate the effect. My understanding of a ring flash comes from 100's of post all across the internet from Dave Hill, David Hobby, David Tejada (The Davids rule, I know!), photo.net, etc… So I could from a technical point of view, say what I should expect from a ring light. So here we go:
Setup 1:

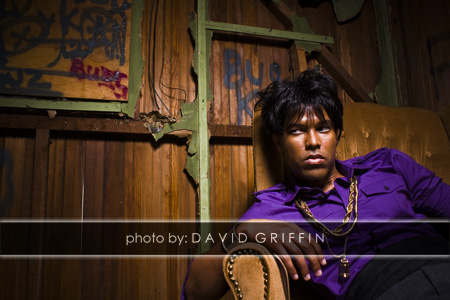
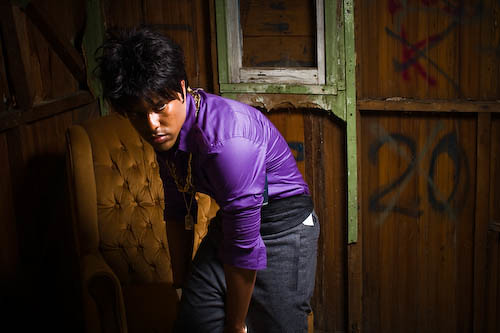
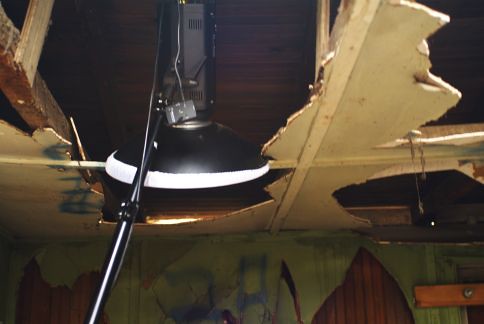
Beauty Dish high in a diffusion sock into the ceiling!
Here I set the Dish as high as I could (about 11ft) into the ceiling to allow the light to be high enough to place the model in the beauty dishes' optimal focal point (the best distance for your size beauty dish-remember, this is highly objective). I set the diffusion sock on the beauty dish to soften the light and allow the light to spread out softly. At the opposite corner I placed a 42" 5n1 reflector (gold side up) to softly fill shadows were inherently dark because of the use of such a small main light small because of the lights size and distance. I chose the gold side so that some complimentary warmth would be added to the skin.
The key to this simple 1 light setup (That's right, 1 light!) was to get the dish high enough overhead to allow the light to spread out wide enough to light both my scene and my subject. (Dont miss that lil Elinchrom Skyport radio receiver on the flash just above the dish and sock in the picture). This simple combination creates some moody yet controlled light. The dish creates a circle of light with a dramatic falloff while the reflector softly fills the totally dark areas of my model.
SETUP 2:
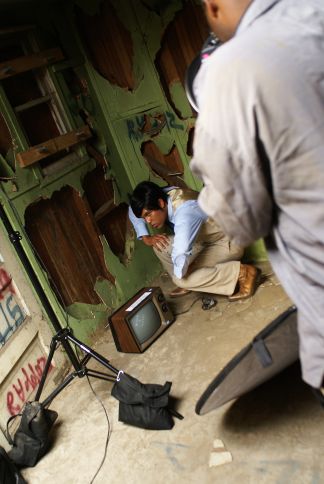

Beauty Dish with Ringlight fill!
Starting with the same setup as before the only differnece this time is add the almighty RINGLIGHT for fill light!! The last thing you guys should have done is let me out of the cage with a ring light! Which ring light you ask? The Alien Bees ABR800 of course! Why you ask? 'Cause its CHEEEEEAP! In a few images I used a 42" disc reflector (gold side) on the floor to catch some of the light and bounce it into the models shadow side.Here's the dire important part. Make sure your ring light does not equal nor overpower your main lights output and viola… instant hit! Fine detail and deep imposing drama all in one image!
I have gotta admit it my ring light training lasted all the better of 90 seconds! Paul C. Buff created a marvelous tool! (Check out the review here on on Me working the ABR800 studiolighting.net!) I give this thing a serious P.O.C. Endorsement! Why? Its easy to figure out, lightweight, packs a good amount of light, being able to use it with a standard photo umbrella, with it being an expandable SYSTEM (not just single use tool) with the optional 30" & 56" moon unit diffuser tools make this the ONLY ballgame in town worth your $399.00 (as far as ring flashes go)! (By the way, my cheap cap on lighting equipment is $400 for any single piece of lighting gear… SO HA!!)
SETUP 3:
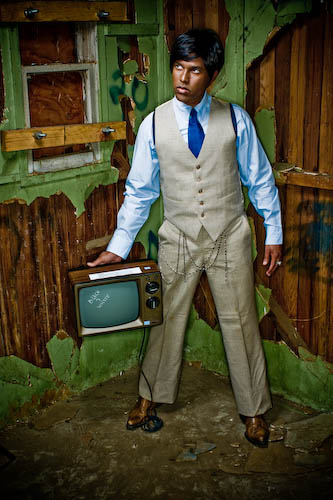
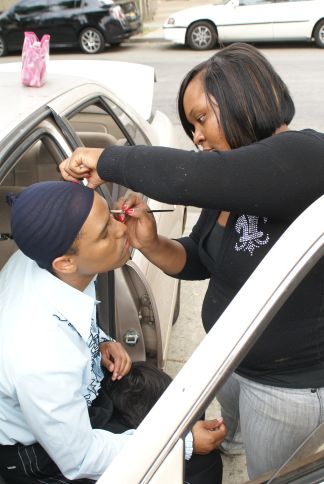
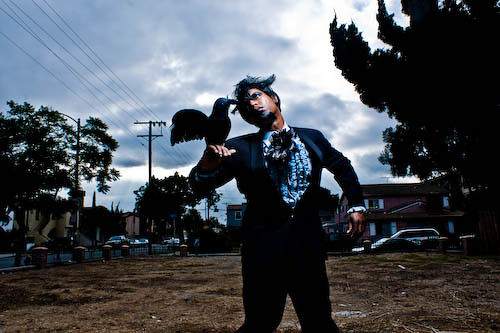
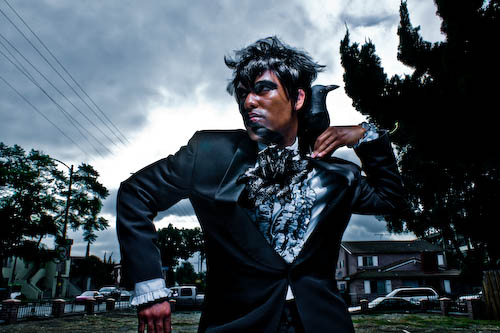
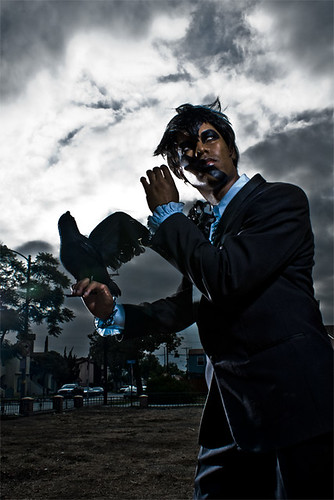
Constance Foe: The M.U.A. from heaven! Here she gets our third makeup change all tidy for some really wild outside shots where we'll be going for and edgy "who knows what but it was fun having the local kids stare and stop" shots! Be sure to check out more of Constance's work at Model Mayhem. Side note. This girl has been through MUA schools and is a trained professional. Look at the magnificent jump in image quality and polish by combining a real model and a real Makeup Artist together with good light. Its the unstoppable force called a team! The polish a that a professional makeup artist has is very valuable new guys. Spend a little bit of money after you read all this good info on Studiolighting.net and get a makeup artist to work with you once in a while. The touch she lends cuts out loads of photoshop time, and also makes it soooo eeeeasssy to get a great image when you walk in with a polished looking subject! Hire Constance now before she's back on another movie set (Blatant PLUG!). Yes the model wore a wig. Yes there is a fake $10 art and craft store crow in the shot… yes that is your mothers old TV set!
I put away the ring light finally because it has a very low value (to me) when there's not lots of stuff nearby for all those crazy shadows to fall and paint over. Time to go outside!
The magic here happened because we had the patience to wait for the ambient light to die down a lot when there was heavy cloud outdoors. This is naturally a great setup for dramatic backgrounds. The second piece of magic is that since I am using a hard light source, shadows will be deep and dark creating drama. Then, by overpowering what little daylight was already there, I was ultimately able to create a dramatically dark backdrop that we could do no wrong in front of! As for the lighting. Just two! My 16" Beauty Dish about 12 feet away from my subject to just cover him with hard light and a small Britek built BB-200 slave at half power about 12 feet away from the the rear (off to the far left side). Lighting Recap: Thick Clouds + Subdued Ambient Light + Hard Light Source + More light on subject than background = dramatic possibilities! With the the minor addition of $90 Britek BB-200 about 12 feet away, I was able to sculp this creature into something great while separating him from the background better.
Regard,
Mohd Zaidi Bin Desa
Principal Photographer
Mzaidi.com
+60195112662
edphotographykedah@gmail.com
Wednesday, May 20, 2009
Saturday, May 16, 2009
Friday, February 27, 2009
Tuesday, January 20, 2009
Wednesday, December 3, 2008
White Balance
Color Temperature
Most light sources are not 100% pure white but have a certain "color temperature", expressed in Kelvin. For instance, the midday sunlight will be much closer to white than the more yellow early morning or late afternoon sunlight. This diagram gives rough averages of some typical light sources.
Type of Light
Color Temperature in K
Candle Flame
1,500
Incandescent
3,000
Sunrise, Sunset
3,500
Midday Sun, Flash
5,500
Bright Sun, Clear Sky
6,000
Cloudy Sky, Shade
7,000
Blue Sky
9,000
Latest News
Just posted! Tamron 18-270mm VC lens review
Nikon unveils 24.5MP D3X digital SLR
Budget Compact Camera Group Test
Panasonic - new flash and firmware for DMC-LX3
Just Posted! Canon Powershot G10 review
Adobe updates Camera Raw for CS4
Canon US video and printer rebate glitch
Kodak challenges Samsung and LG on patents
Sony develops CMOS sensor for phones
Just posted! Pentax 50mm F1.4 lens review
Sigma buys sensor developer Foveon
Samsung Techwin to spin-out camera division
Sigma DP1 Firmware Update
Phase One releases Capture One v4.5.1
dpreview.com blog
White Balance
White BalanceBy Vincent Bockaert
Color TemperatureMost light sources are not 100% pure white but have a certain "color temperature", expressed in Kelvin. For instance, the midday sunlight will be much closer to white than the more yellow early morning or late afternoon sunlight. This diagram gives rough averages of some typical light sources.
Type of Light
Color Temperature in K
Candle Flame
1,500
Incandescent
3,000
Sunrise, Sunset
3,500
Midday Sun, Flash
5,500
Bright Sun, Clear Sky
6,000
Cloudy Sky, Shade
7,000
Blue Sky
9,000
White Balance
Normally our eyes compensate for lighting conditions with different color temperatures. A digital camera needs to find a reference point which represents white. It will then calculate all the other colors based on this white point. For instance, if a halogen light illuminates a white wall, the wall will have a yellow cast, while in fact it should be white. So if the camera knows the wall is supposed to be white, it will then compensate all the other colors in the scene accordingly.
Most digital cameras feature automatic white balance whereby the camera looks at the overall color of the image and calculates the best-fit white balance. However these systems are often fooled especially if the scene is dominated by one color, say green, or if there is no natural white present in the scene as show in this example.
The auto white balance was unable to find a white reference, resulting in dull and artificial colors.
The auto white balance got it right this time in a very similar scene because it could use the clouds as its white reference.
Most digital cameras also allow you to choose a white balance manually, typically sunlight, cloudy, fluorescent, incandescent etc. Prosumer and SLR digital cameras allow you to define your own white balance reference. Before making the actual shot, you can focus at an area in the scene which should be white or neutral gray, or at a white or gray target card. The camera will then use this reference when making the actual shot.
Most light sources are not 100% pure white but have a certain "color temperature", expressed in Kelvin. For instance, the midday sunlight will be much closer to white than the more yellow early morning or late afternoon sunlight. This diagram gives rough averages of some typical light sources.
Type of Light
Color Temperature in K
Candle Flame
1,500
Incandescent
3,000
Sunrise, Sunset
3,500
Midday Sun, Flash
5,500
Bright Sun, Clear Sky
6,000
Cloudy Sky, Shade
7,000
Blue Sky
9,000
Latest News
Just posted! Tamron 18-270mm VC lens review
Nikon unveils 24.5MP D3X digital SLR
Budget Compact Camera Group Test
Panasonic - new flash and firmware for DMC-LX3
Just Posted! Canon Powershot G10 review
Adobe updates Camera Raw for CS4
Canon US video and printer rebate glitch
Kodak challenges Samsung and LG on patents
Sony develops CMOS sensor for phones
Just posted! Pentax 50mm F1.4 lens review
Sigma buys sensor developer Foveon
Samsung Techwin to spin-out camera division
Sigma DP1 Firmware Update
Phase One releases Capture One v4.5.1
dpreview.com blog
White Balance
White BalanceBy Vincent Bockaert
Color TemperatureMost light sources are not 100% pure white but have a certain "color temperature", expressed in Kelvin. For instance, the midday sunlight will be much closer to white than the more yellow early morning or late afternoon sunlight. This diagram gives rough averages of some typical light sources.
Type of Light
Color Temperature in K
Candle Flame
1,500
Incandescent
3,000
Sunrise, Sunset
3,500
Midday Sun, Flash
5,500
Bright Sun, Clear Sky
6,000
Cloudy Sky, Shade
7,000
Blue Sky
9,000
White Balance
Normally our eyes compensate for lighting conditions with different color temperatures. A digital camera needs to find a reference point which represents white. It will then calculate all the other colors based on this white point. For instance, if a halogen light illuminates a white wall, the wall will have a yellow cast, while in fact it should be white. So if the camera knows the wall is supposed to be white, it will then compensate all the other colors in the scene accordingly.
Most digital cameras feature automatic white balance whereby the camera looks at the overall color of the image and calculates the best-fit white balance. However these systems are often fooled especially if the scene is dominated by one color, say green, or if there is no natural white present in the scene as show in this example.
The auto white balance was unable to find a white reference, resulting in dull and artificial colors.
The auto white balance got it right this time in a very similar scene because it could use the clouds as its white reference.
Most digital cameras also allow you to choose a white balance manually, typically sunlight, cloudy, fluorescent, incandescent etc. Prosumer and SLR digital cameras allow you to define your own white balance reference. Before making the actual shot, you can focus at an area in the scene which should be white or neutral gray, or at a white or gray target card. The camera will then use this reference when making the actual shot.
Tuesday, December 2, 2008
TIFF
TIFF (Tagged Image File Format) is a universal image format that is compatible with most image editing and viewing programs. It can be compressed in a lossless way, internally with LZW or Zip compression, or externally with programs like WinZip. While JPEG only supports 8 bits/channel single layer RGB images, TIFF also supports 16 bits/channel multi-layer CMYK images in PC and Macintosh format. TIFF is therefore widely used as a final format in the printing and publishing industry.
Many digital cameras offer TIFF output as an uncompressed alternative to compressed JPEG. Due to space and processing constraints only the 8 bits/channel version is used in digital cameras. Higher-end scanners offer a 16 bits/channel TIFF option. If available, RAW is a much better alternative for digital cameras than TIFF.
Many digital cameras offer TIFF output as an uncompressed alternative to compressed JPEG. Due to space and processing constraints only the 8 bits/channel version is used in digital cameras. Higher-end scanners offer a 16 bits/channel TIFF option. If available, RAW is a much better alternative for digital cameras than TIFF.
Wednesday, November 26, 2008
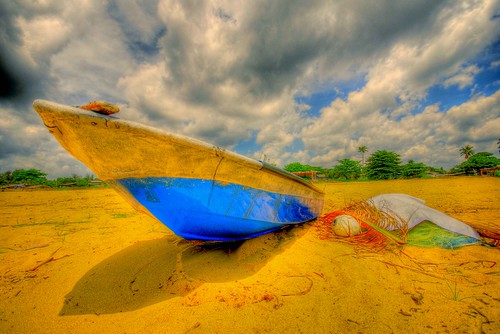
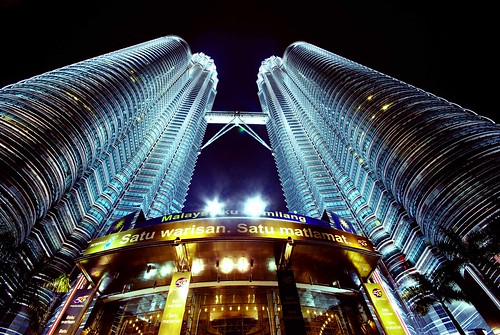
Menghasilkan Gambar HDR....
Gambar HDR ialah hasil kombinasi gambar yang berlainan exposure bagi menghasilkan sekeping gambar everage exposure, selalunya gambar HDR ini dikaitkan dengan gambar pemandangan sama ada waktu senja, subuh, malam dan sebagainya. Tidak salah juga menghasilkan gambar HDR.Di bawah adalah beberapa keping gambar hasil dari saya....
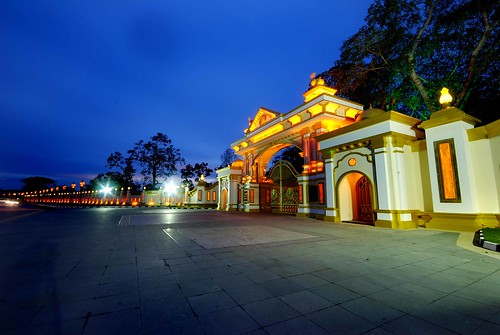 Copyright © mzaidi.com
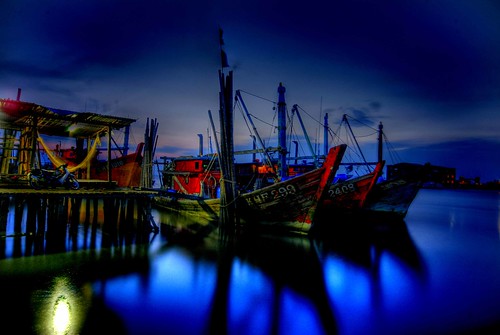 Copyright © mzaidi.com
 Copyright © mzaidi.com
 Copyright © mzaidi.com
 Copyright © mzaidi.com
regard,
Mohd Zaidi Bin Desa
Principal Photographer
Mzaidi.com
+60195112662
edphotographykedah@gmail.com

Copyright © mzaidi.com Copyright © mzaidi.com Copyright © mzaidi.com Copyright © mzaidi.com Copyright © mzaidi.comregard,
Mohd Zaidi Bin Desa
Principal Photographer
Mzaidi.com
+60195112662
edphotographykedah@gmail.com
Monday, December 3, 2007
Photographic filters
Photographic filters have been in use for a long time. They were required for special effects or to enhance the contrast of some colors. They were also used for white balance.
For example, a film set for daylight color temperature, would have produced yellowish photos when taken inside, with incandescent light bulbs lighting the scene. To compensate, a blue filter had to be used, to get the right colors.
The major advantage of digital cameras is the fact that you can adjust the white balance of a scene electronically, without the use of a color filter. As far as the image effects that could be obtained with some filters (like blurring the image, changing color hue for specific areas of a photograph, etc.) there are better ways of getting them onto a photo.
Very cheap image software can produce more effects on a photograph than all the filters in the world combined. With a little bit of imagination, using software to get the effects you want is the best way to go.
The only filter a digital camera actually needs is a polarizer.
Polarizers come in two varieties:Linear polarizers Circular polarizers
Each has the same effect but circular polarizers are more expensive. Digital cameras can use both (linear and circular) polarizers.
Polarizers produce deeper colored blue skies, minimize light reflections from glass and water and reduces glare from non-metallic surfaces. They also provide good color saturation. Can be used in extremely bright light situations to reduce the amount of light entering the camera; this enables more selective depth of field control.
For example, a film set for daylight color temperature, would have produced yellowish photos when taken inside, with incandescent light bulbs lighting the scene. To compensate, a blue filter had to be used, to get the right colors.
The major advantage of digital cameras is the fact that you can adjust the white balance of a scene electronically, without the use of a color filter. As far as the image effects that could be obtained with some filters (like blurring the image, changing color hue for specific areas of a photograph, etc.) there are better ways of getting them onto a photo.
Very cheap image software can produce more effects on a photograph than all the filters in the world combined. With a little bit of imagination, using software to get the effects you want is the best way to go.
The only filter a digital camera actually needs is a polarizer.
Polarizers come in two varieties:Linear polarizers Circular polarizers
Each has the same effect but circular polarizers are more expensive. Digital cameras can use both (linear and circular) polarizers.
Polarizers produce deeper colored blue skies, minimize light reflections from glass and water and reduces glare from non-metallic surfaces. They also provide good color saturation. Can be used in extremely bright light situations to reduce the amount of light entering the camera; this enables more selective depth of field control.
Exposure Compensation
Exposure Compensation is a feature on a digital camera that allows you to adjust the shutter speed measured by its light meter. Usually, the range of adjustment goes from +2 to -2 EV in 1/3 steps.
Lets say that you point the camera at you subject and the meter says you need 1/250 sec. shutter speed at aperture 5.
If for whatever reason you select +1 exposure compensation, the shutter speed used by the camera will be 1/125 sec.
If you use -1 exposure compensation, the shutter speed will be 1/500 sec.
Every increment in exposure compensation (+2 +1 -1 -2) increases or decreases the amount of light going through the camera by a factor of 2.
Lets say that you point the camera at you subject and the meter says you need 1/250 sec. shutter speed at aperture 5.
If for whatever reason you select +1 exposure compensation, the shutter speed used by the camera will be 1/125 sec.
If you use -1 exposure compensation, the shutter speed will be 1/500 sec.
Every increment in exposure compensation (+2 +1 -1 -2) increases or decreases the amount of light going through the camera by a factor of 2.
White Balance
The white balance setting for a digital camera is very useful in dealing with various light conditions. The best way to understand this setting is to place a white sheet of paper in front of your camera and take a photograph.
If the image has a white sheet of paper in it, you're ok; but if the paper has a yellowish hue, you're in trouble.
To better understand this process, take a look at your lamp. It usually uses an incandescent bulb. If you look closely, you'll notice that the color of this particular source of light has a yellow hue. The digital camera amplifies this hue and you get a yellowish photograph.
So, before taking any photo, look around at your sources of light। Even if you are outdoors, there are white balance settings that will make your photo look a lot better.
Daylight white balance
Cloudy white balance
Tungsten white balance
Fluorescent white balance
Flash white balance
If the image has a white sheet of paper in it, you're ok; but if the paper has a yellowish hue, you're in trouble.
To better understand this process, take a look at your lamp. It usually uses an incandescent bulb. If you look closely, you'll notice that the color of this particular source of light has a yellow hue. The digital camera amplifies this hue and you get a yellowish photograph.
So, before taking any photo, look around at your sources of light। Even if you are outdoors, there are white balance settings that will make your photo look a lot better.
Daylight white balance
Cloudy white balance
Tungsten white balance
Fluorescent white balance
Flash white balance
Subscribe to:
Posts (Atom)