Thursday, October 21, 2010
Brand New Nikkor 80-200mm f/2.8 RM3500
Price : RM3500
FOC shipping witin peninsular malaysia
for booking please call
0124436143
0195112662
MZAIDI Technology
http://digitalgadgets2u.com
Wednesday, October 20, 2010
Brand New Canon 1000D RM1580 (FOC 4gb sd card +bag sling)
Price : RM1580
FOC
4gb SD card
bag sling
shipping witin peninsular malaysia
for booking please call
0124436143
0195112662
MZAIDI Technology
http://digitalgadgets2u.com
BRAND NEW YN 460 RM180
Price : RM180
for booking please call
0124436143
0195112662
MZAIDI Technology
http://digitalgadgets2u.com
Brand New Canon 60d
Price : RM3050 (BODY ONLY)
for booking please call
0124436143
0195112662
MZAIDI Technology
http://digitalgadgets2u.com
Saturday, May 23, 2009
The Magazine Shoot
Here's the best part! It measured a massive 11 feet high, 8 feet wide by 6 feet deep! It was like 1/3rd the size of my garage studio! I wouldn't even have room to put a gear bag inside while I shoot! But guess what, for all its negatives, the place had more "Character" than anything I have seen since watching an old Friday the 13th horror flick! Now, firmly intent on photographing the very Soul from this set I set out to plan my lighting scheme(s) to go in and come out happy! Just a little side note. Having a creative visionary to help you spot out things like this and plan this is ultra critical! Kevin was instrumental in the look and style of the shoot he said keywords that I was able to translate into my lighting. Hey New Guys! Serious word of advice, find another photographer and BE friends! Bounce ideas and share! Look at my sharing, 30+ thousand a month! It makes everyone better!


Regard,
Mohd Zaidi Bin Desa
Principal Photographer
Mzaidi.com
+60195112662
edphotographykedah@gmail.com

SHOOT DAY
With rain clearly in threat, I reluctantly call off my assistant for the day. (Sorry again Mrs. Land.) Because of over packing I am embarrassingly the last to arrive. The MUA had already begun the magic of applying a severe coating of "Pancake Makeup" to Kevin's face. Under the clock of 2 hrs to play we were given a heckuva gift to test out… the Paul C. Buff ABR-800. Now, I will make an honest confession Studiolighting.net. Totally honest. This was the absolute very first time I had used a ring light! The closest thing to it was placing an 84inch Photek Sunbuster umbrella directly behind me in a 1200 watt Profoto head (studio rental) to simulate the effect. My understanding of a ring flash comes from 100's of post all across the internet from Dave Hill, David Hobby, David Tejada (The Davids rule, I know!), photo.net, etc… So I could from a technical point of view, say what I should expect from a ring light. So here we go:
Setup 1:

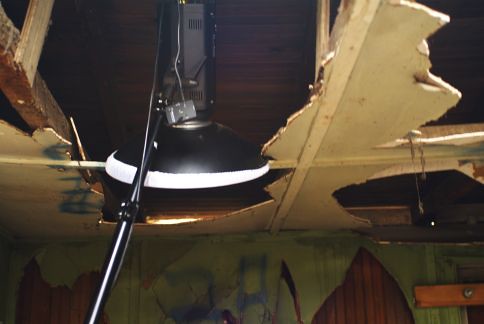
Beauty Dish high in a diffusion sock into the ceiling!
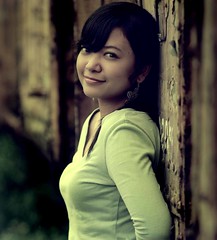
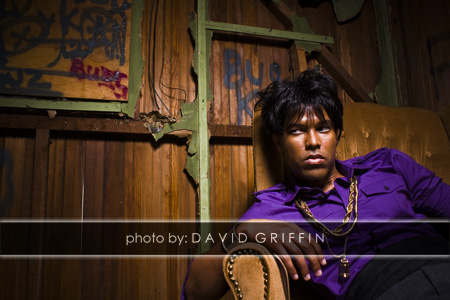
Here I set the Dish as high as I could (about 11ft) into the ceiling to allow the light to be high enough to place the model in the beauty dishes' optimal focal point (the best distance for your size beauty dish-remember, this is highly objective). I set the diffusion sock on the beauty dish to soften the light and allow the light to spread out softly. At the opposite corner I placed a 42" 5n1 reflector (gold side up) to softly fill shadows were inherently dark because of the use of such a small main light small because of the lights size and distance. I chose the gold side so that some complimentary warmth would be added to the skin.
The key to this simple 1 light setup (That's right, 1 light!) was to get the dish high enough overhead to allow the light to spread out wide enough to light both my scene and my subject. (Dont miss that lil Elinchrom Skyport radio receiver on the flash just above the dish and sock in the picture). This simple combination creates some moody yet controlled light. The dish creates a circle of light with a dramatic falloff while the reflector softly fills the totally dark areas of my model.
SETUP 2:

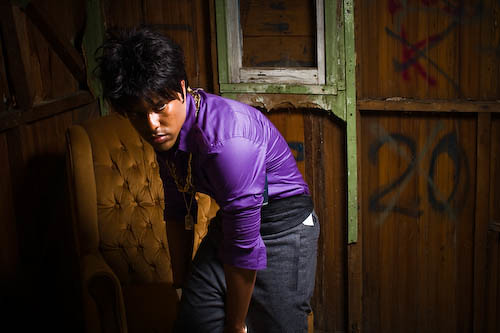
Beauty Dish with Ringlight fill!
Starting with the same setup as before the only differnece this time is add the almighty RINGLIGHT for fill light!! The last thing you guys should have done is let me out of the cage with a ring light! Which ring light you ask? The Alien Bees ABR800 of course! Why you ask? 'Cause its CHEEEEEAP! In a few images I used a 42" disc reflector (gold side) on the floor to catch some of the light and bounce it into the models shadow side.Here's the dire important part. Make sure your ring light does not equal nor overpower your main lights output and viola… instant hit! Fine detail and deep imposing drama all in one image!
I have gotta admit it my ring light training lasted all the better of 90 seconds! Paul C. Buff created a marvelous tool! (Check out the review here on on Me working the ABR800 studiolighting.net!) I give this thing a serious P.O.C. Endorsement! Why? Its easy to figure out, lightweight, packs a good amount of light, being able to use it with a standard photo umbrella, with it being an expandable SYSTEM (not just single use tool) with the optional 30" & 56" moon unit diffuser tools make this the ONLY ballgame in town worth your $399.00 (as far as ring flashes go)! (By the way, my cheap cap on lighting equipment is $400 for any single piece of lighting gear… SO HA!!)
SETUP 3:
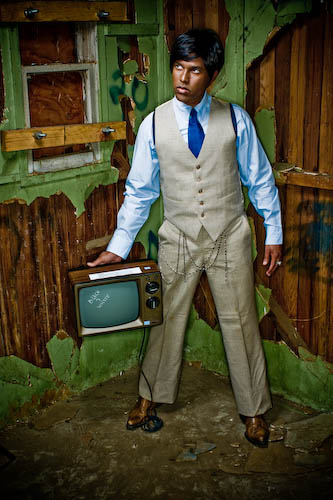
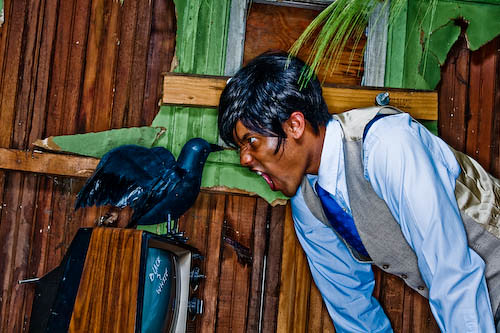
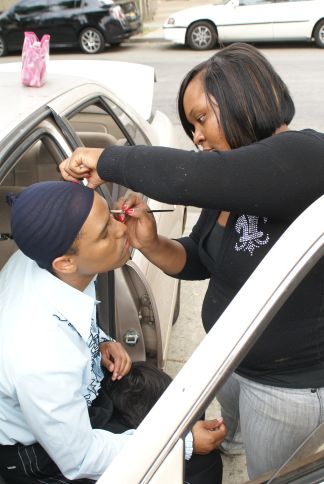
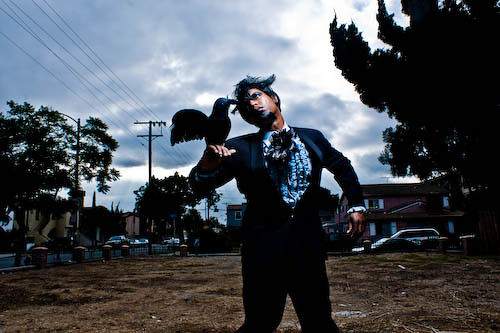
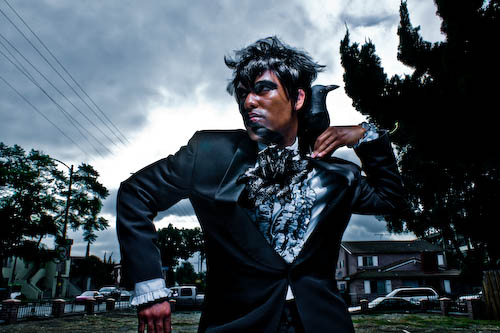
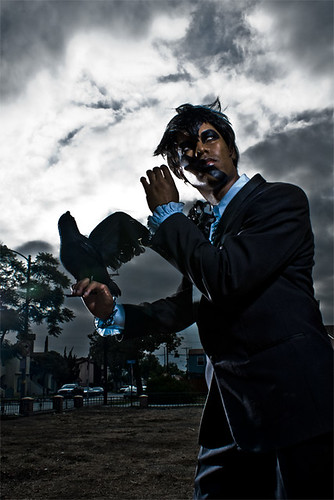
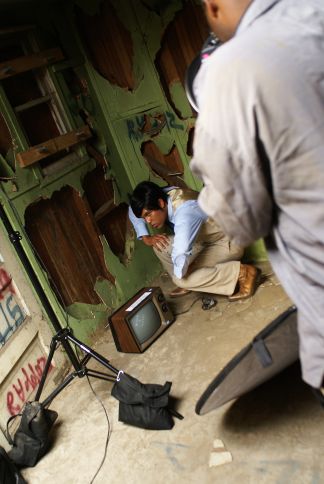
Constance Foe: The M.U.A. from heaven! Here she gets our third makeup change all tidy for some really wild outside shots where we'll be going for and edgy "who knows what but it was fun having the local kids stare and stop" shots! Be sure to check out more of Constance's work at Model Mayhem. Side note. This girl has been through MUA schools and is a trained professional. Look at the magnificent jump in image quality and polish by combining a real model and a real Makeup Artist together with good light. Its the unstoppable force called a team! The polish a that a professional makeup artist has is very valuable new guys. Spend a little bit of money after you read all this good info on Studiolighting.net and get a makeup artist to work with you once in a while. The touch she lends cuts out loads of photoshop time, and also makes it soooo eeeeasssy to get a great image when you walk in with a polished looking subject! Hire Constance now before she's back on another movie set (Blatant PLUG!). Yes the model wore a wig. Yes there is a fake $10 art and craft store crow in the shot… yes that is your mothers old TV set!
I put away the ring light finally because it has a very low value (to me) when there's not lots of stuff nearby for all those crazy shadows to fall and paint over. Time to go outside!
The magic here happened because we had the patience to wait for the ambient light to die down a lot when there was heavy cloud outdoors. This is naturally a great setup for dramatic backgrounds. The second piece of magic is that since I am using a hard light source, shadows will be deep and dark creating drama. Then, by overpowering what little daylight was already there, I was ultimately able to create a dramatically dark backdrop that we could do no wrong in front of! As for the lighting. Just two! My 16" Beauty Dish about 12 feet away from my subject to just cover him with hard light and a small Britek built BB-200 slave at half power about 12 feet away from the the rear (off to the far left side). Lighting Recap: Thick Clouds + Subdued Ambient Light + Hard Light Source + More light on subject than background = dramatic possibilities! With the the minor addition of $90 Britek BB-200 about 12 feet away, I was able to sculp this creature into something great while separating him from the background better.
Regard,
Mohd Zaidi Bin Desa
Principal Photographer
Mzaidi.com
+60195112662
edphotographykedah@gmail.com
Wednesday, May 20, 2009
Saturday, May 16, 2009
Subscribe to:
Posts (Atom)